Configure Zoom for UserLock Single Sign-On (SSO)
Enable Zoom Single Sign-On (SSO) with UserLock to centralize authentication, enforce corporate access policies, and simplify user access to Zoom.
This guide explains how to integrate Zoom with UserLock Single Sign-On (SSO) using the SAML 2.0 protocol.
Once configured, Zoom logins are authenticated by UserLock against Active Directory, enabling administrators to enforce UserLock access policies (MFA, time, machine, or location restrictions) on Zoom sessions. Zoom acts as the SAML Service Provider and can create a Zoom user account when a user signs in successfully for the first time.
🚩️ Before starting:
You need a Zoom Business, Education, or Enterprise account.
You need Zoom account owner or administrator permissions.
Your Zoom account must have an approved Vanity URL, for example
https://contoso.zoom.us.You need to know the email domain used by your Zoom users, for example
contoso.com.UserLock SSO must already be installed and configured, and reachable publicly over HTTPS with a valid SSL certificate.
To request or check a Vanity URL, open https://zoom.us/account, go to Account Management ▸ Account Profile and locate Vanity URL. Zoom cannot be configured for SAML SSO until the Vanity URL has been approved.
⚠️ Important
Keep at least one Zoom administrator account with a known password, and add it to the SSO bypass list before you require SSO. A bypass account added after an outage cannot be used to regain access. See Configure a Zoom recovery administrator.
Do not require SSO for your email domain until the complete sign-in flow has been tested.
In the UserLock console, go to ⚙️ Server settings ▸ Single Sign-On.
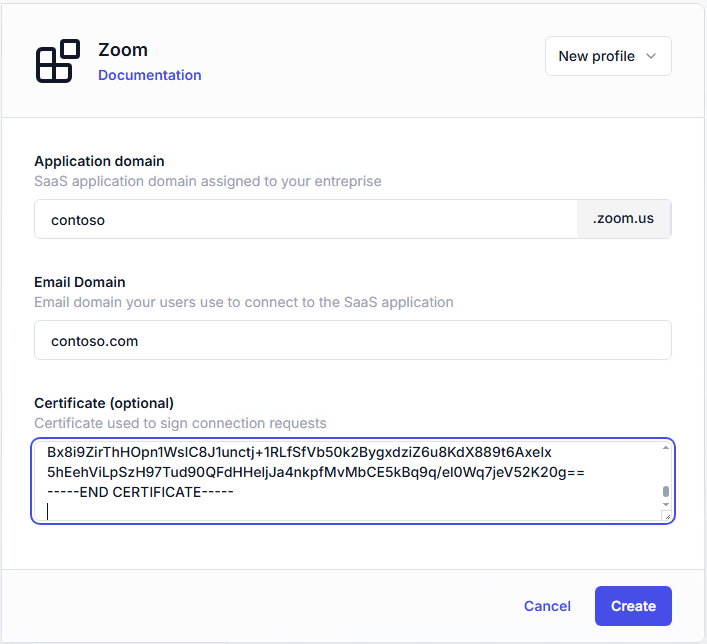
In the application list, select Zoom.
Complete the Zoom profile:
Settings
Values
Application Domain
The Vanity URL subdomain only. For
https://contoso.zoom.us, entercontosoEmail domain
Domain used by users to authenticate. For example
contoso.comCertificate
Leave empty unless you enable signed SAML requests in Zoom
Save the profile.
For a Vanity URL of https://contoso.zoom.us, UserLock expects the following Zoom Service Provider values:
SAML value | Expected value |
|---|---|
Service Provider Entity ID / Audience |
|
Assertion Consumer Service URL |
|
The Entity ID does not include https://.
Note
UserLock supports multiple Zoom profiles. Create one profile for each Zoom account or Vanity URL that you want to federate.
Your UserLock SSO URL is displayed in ⚙️ Server settings ▸ Single Sign-On. In this guide, <SSO_address> is that URL without the protocol. For https://sso.contoso.com, the SSO address is sso.contoso.com. If the URL uses a custom port, include it in every endpoint: https://sso.contoso.com:450 gives sso.contoso.com:450.
Open
https://zoom.us/signinand sign in with a Zoom account owner or administrator account.Go to Advanced ▸ Single Sign-On.
If your account has several Vanity URLs, select the one you are configuring.
Click Edit.
Then choose one of the two methods below.
Import the UserLock SAML metadata using either option:
Metadata URL: enter
https://<SSO_address>/metadata.Metadata file: in the UserLock console, go to ⚙️Server settings ▸ Single Sign-On, click Download ▸ Metadata file, then upload the file to Zoom.
Review the imported values against the table in Method B, and correct any field Zoom did not fill or filled incorrectly.
Click Save Changes.
Complete the Zoom SSO configuration with the following values:
Zoom setting | Value |
|---|---|
Sign-in page URL |
|
Sign-out page URL |
|
Service Provider (SP) Entity ID | The value without |
Issuer (IdP Entity ID) |
|
Binding | HTTP-POST |
Signature Hash Algorithm | SHA-256 |
Provision User | At Sign-In |
Sign SAML request | Disabled |
Sign SAML logout request | Disabled |
Support encrypted assertions | Disabled |
Then configure the Identity Provider Certificate:
In the UserLock console, go to ⚙️ Server settings ▸ Single Sign-On and click Download ▸ SAML certificate.
Open the certificate in a text editor and copy its full content, including the
-----BEGIN CERTIFICATE-----and-----END CERTIFICATE-----lines.Paste the content into the Zoom Identity Provider Certificate field.
Click Save Changes.
UserLock sends the user's matching email address as the SAML NameID, and provides the email address, first name and last name as SAML attributes. Configure Zoom to map them to the user profile fields.
In the Zoom web portal, go to Advanced ▸ Single Sign-On.
Open the SAML Response Mapping tab.
Under SAML Basic Information Mapping, configure:
Email Address:
urn:oid:0.9.2342.19200300.100.1.3First Name:
urn:oid:2.5.4.42Last Name:
urn:oid:2.5.4.4
Set Default License Assignment:
Basic for an unlicensed Zoom user.
Licensed if users should receive an available paid license.
None only if you use Advanced SAML Mapping to grant licenses selectively.
Optionally enable Update at each SSO login for the first name and last name fields, so Zoom synchronizes these values on every sign-in.
Save the response mapping.
⚠️ Important
If Default License Assignment is set to None and no advanced mapping grants a license, new SSO users are denied access.
Keep your existing Zoom administrator session open while testing.
From a web browser:
Open an incognito or private browser window.
Open your Vanity URL, for example
https://contoso.zoom.us, and click Sign in.Authenticate through UserLock with an Active Directory account whose email address matches the Email domain configured in the Zoom profile.
Confirm that the user is redirected to UserLock, that authentication succeeds, that the user reaches the correct Zoom account with the right email address, first name and last name, and that the expected license is assigned.
From the Zoom Workplace application:
Open the desktop or mobile application and select Sign In with SSO.
Enter the company domain, which is the Vanity URL subdomain. For
https://contoso.zoom.us, entercontoso, not the email domain and not the full URL.Continue and authenticate through UserLock.
Note
With Provision User set to At Sign-In, Zoom creates a new account after the first successful SSO authentication. If the user's email domain is not an approved Zoom associated domain, Zoom may ask the user to confirm ownership of the email address before provisioning completes. Verifying the domain removes this step.
The standard configuration does not require Zoom to sign incoming SAML authentication requests. Leave Sign SAML request and Sign SAML logout request disabled unless your organization requires signature validation.
If you enable either setting:
Open the Zoom Service Provider metadata at
https://<Zoom_subdomain>.zoom.us/saml/metadata/sp, for examplehttps://contoso.zoom.us/saml/metadata/sp.Locate the X.509 certificate associated with the signing key and copy its value.
In the UserLock console, open the Zoom application profile and paste the value into the Certificate field.
Save the profile.
If Zoom later changes its Service Provider signing certificate, update the Certificate field in UserLock before the new certificate is used.
Adding your email domain as a Zoom associated domain removes the email ownership confirmation for new users, and it is required before you can enforce SSO for that domain.
In the Zoom web portal, go to Account Management ▸ Account Profile.
Open the Account Profile tab.
Under Associated Domains, click + Add Other Domains.
Enter the email domain used by your Zoom users, for example
contoso.com, then click Add Domains.Click Verify next to the domain and select a verification method: DNS TXT record, HTML file upload, meta tag on the domain website, or manual approval by Zoom Support.
Once the domain is verified, enable Manage users with the same domain and save.
⚠️ Important
Enabling domain management affects existing Zoom users who share the same email domain but do not belong to your Zoom account. Review the User Summary before you enable it.
A recovery administrator can sign in with a Zoom password while SSO is enforced. Configure it before you require SSO.
Go to Advanced ▸ Security.
Under Sign-in Methods, confirm that Allow users to sign in with work email remains enabled. Without a second sign-in method, the bypass account cannot be used.
Confirm that at least one Zoom account owner or administrator has a known Zoom password.
Under Specify users who can bypass SSO sign-in, click + Add Users and add the recovery administrator's email address.
Save, then test the recovery account in a private browser window from
https://zoom.us/signin.
Configuring SAML SSO does not disable password sign-in. To force users from your email domain through UserLock, the domain must first be verified and managed.
Go to Advanced ▸ Security ▸ Sign-in Methods and enable Allow users to sign in with Single Sign-On (SSO).
Select Require users to sign in with SSO if their e-mail address belongs to one of the domains below.
Click Select Domains and select the verified email domain.
Confirm that the recovery administrator appears in the SSO bypass list.
Click Save.
When you renew the UserLock SAML certificate, replace the certificate in Zoom during Step 2. Update SaaS applications of the Renew the SAML certificate procedure.
Copy the new certificate displayed in the UserLock Configuration Wizard.
In the Zoom web portal, go to Advanced ▸ Single Sign-On and click Edit.
Replace the Identity Provider Certificate, including the
-----BEGIN CERTIFICATE-----and-----END CERTIFICATE-----lines.Click Save Changes, then return to the wizard.
Note
Zoom's Automatically manage the certificate setting applies to Zoom's own Service Provider certificate. It does not replace the UserLock identity provider certificate.
For common issues, see Troubleshooting SSO. If the problem persists, contact IS Decisions Support.
UserLock found no email address on the authenticating Active Directory account matching the Email domain configured in the Zoom profile. Confirm that:
The Email domain in UserLock is correct.
The Active Directory user has an email address in that domain, present in the
mailorproxyAddressesattributes.The address contains no typing error and no unexpected subdomain.
An Email domain of contoso.com requires an address such as user@contoso.com.
Application Domain contains more than the Vanity URL subdomain. See Step 1.
Check the three attribute mappings in Advanced ▸ Single Sign-On ▸ SAML Response Mapping against Step 3, then confirm that the Active Directory account holds the correct email address, given name and surname.
Sign SAML request or Sign SAML logout request is enabled in Zoom, and the current Zoom Service Provider signing certificate is missing or outdated in the UserLock Zoom profile. See Validate signed SAML requests. If request signing is not required, disable both Zoom settings and leave the UserLock Certificate field empty.
Open https://<SSO_address>/metadata from a browser outside your corporate network. It must be reachable over HTTPS and return the UserLock SAML metadata. If it is not, check the public DNS record, the HTTPS binding and SSL certificate, external access to the HTTPS port, and any reverse proxy or firewall rule. You can configure Zoom manually using Enter the SAML settings manually in Step 2 in the meantime.
Use the recovery administrator added to the Zoom SSO bypass list.
Open
https://zoom.us/signinand sign in with the recovery administrator's work email and Zoom password.Go to Advanced ▸ Security ▸ Sign-in Methods.
Clear Require users to sign in with SSO if their e-mail address belongs to one of the domains below and save.
Users can then sign in with another enabled method while the SSO service is unavailable. Re-enable the requirement once UserLock SSO is reachable again.
You can extend the security of SSO sessions by applying UserLock access policies in addition to authentication.
Apply MFA on SaaS connections to require stronger authentication.
Hour restrictions: define when users are allowed to connect.
Geolocation rules: enforce access policies based on user location.
Session limits: allow or deny SaaS logins entirely for specific users.